Change Logs
-
Date Change Wed 04/Jun/2024-
Print Receipt Details have been changed based on the new government mandate:
Wed 14/Mar/2024- LogInAuthorizeAsync endpoint is no longer supported. Use the new LoginGetJwtAsync endpoint to get JWT token to use as Auth Bearer token for every API request.
- All JWT Token lifetime in both the staging and live server will be 20 mins.
- Added a guide on how to use the LoginGetJwtAsync endpoint and the RequestJwtEncryption endpoint.
Wed 13/Mar/2024- Authenticated printing module is now live.
- Public URL is still available however, will be disabled after ICTSI has adjusted to this authenticated process.
Monday 04/Mar/2024- Fixed validation when there is no receipt lines in the request
Monday 19/Feb/2024- Include ACTS EAR Number in the receipt, above the Amount in Words line.
- Include OLRS number (ENTRY_NUMBER post request property) in the receipt, before the first line item.
Tuesday 13/Feb/2024- Created a guide for Using the EOR Stress Test UI.
Sunday 12/Feb/2024-
The set of Response Payloads Description, ErrorName and HTTP Status Codes for Financial Bridge Process has been added.
Click here for the specification.
Sunday 11/Feb/2024- Bot stress test simulation is now available for testing. Click here to access the test simulation.
Saturday 10/Feb/2024- TERMINAL_CODE is now added in the post request receipt payload. Default value is "MICT". Click here for the specification change.
- CWT_AMOUNT is now added in the post request receipt lines payload. Click here for the specification change.
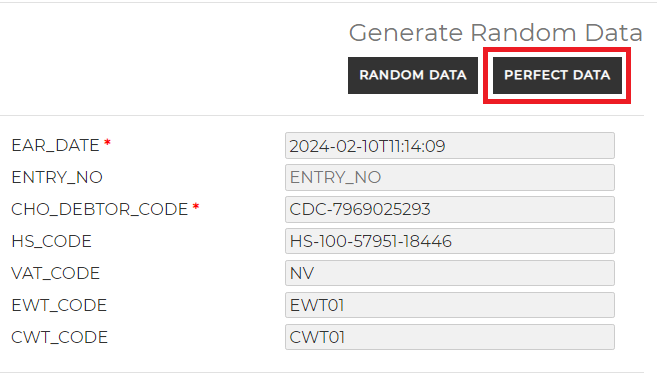
- Receipt Simulation feature now offers a functionality to generate a perfect random data by clicking the button "PERFECT DATA" under Generate Random Data.
- Updated the guide for Posting test requests via Test Simulation UI, this now use the Generate Perfect Data.
Friday 09/Feb/2024- Upon successful receipt post request, the response payload property StatusCode will now return a standard HTTP 201/Created.
- The receipt now contains
- Added full list of Response Payloads Description, ErrorName and HTTP Status Codes
- In the print receipt page, the QTY values are now right-aligned instead of left.
Saturday 07/Feb/2024- Added guide for Posting test requests via Test Simulation UI.
- Added additional description in ReceiptLinesDto's SERVICE_CODE see API Endpoint Documentation
Saturday 03/Feb/2024Release:1.0.5 R06032024.020000| Posting test requests via Test Simulation UI.- Posting and validation of request for acknowledgement receipt
- Printing of test/draft acknowledgement receipt (awaiting for other pieces of data)
Tuesday 30/Jan/2024Monday 29/Jan/2024Added new feature for EOR Test Simulation. This page/route is authenticated and must be logged-in, and roles of EOR User and EOR API Consumer/Client to use. Please see Posting test requests via Test Simulation UI.Friday 26/Jan/2024 Added a guide for posting test requests via REST API Client.
Changed all dark themed images into light themed ones. Please see API Endpoint Documentation for more details.Wednesday 24/Jan/2024 Added the list of the payload request properties in the documentation. Please see API Endpoint Documentation for more details.Wednesday 24/Jan/2024 Added JWT Expiry and request error response payloads in the API Endpoint Documentation.Please see API Endpoint Documentation for more details.Tuesday 23/Jan/2024 As per ICTSI, PPA and Diversified meeting held on 23/Jan/2024, the following changes have to be made:
- In case the communication between ACTS and PPA Web API EOR has been broken, and EOR was not able to emit response back to ICTSI ACTS, ACTS should be able to request the same receipt information.
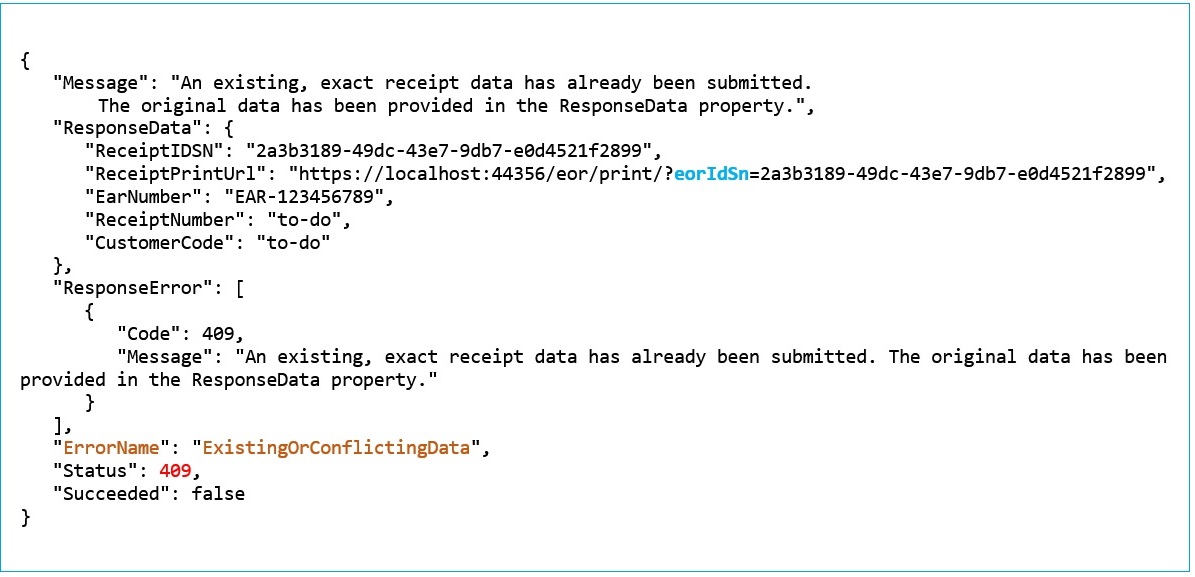
- EOR will return a duplicate (409 Conflict) response code if the same receipt information has been posted. However, giving the link to the original receipt information for printing and/or other purposes.
-
Observe below response from /api/eor/PostDataForAckReceipt
This change is already in effect as of 23/Jan/2024 T-10:00PM+8 in the PPA Web API Staging Server at https://webapi-staging.ppa.com.ph/.Staturday 20/Jan/2024 Initial documentation release. -
Getting Started
- Prerequisite
- The set of API endpoints served by PPA API Server will only accept JSON and/or XML posts via HTTP. The methods defined in each endpoint return varrying data objects from JSON/XML and sometimes, the standard W3C HTTP Response together with the standard response codes.
- The requests may originate from varying sources or platforms, such as LINUX, Windows Server, DB2 to name a few. And can originate from any desktop, mobile and specific OS apps from PHP to JAVA to .NET/C#, MONGO, including mobile applications, etc. -- as long as it sends the standard JSON/XML Format under the HTTP protocol.
Account Registration
- Required
- Please contact PPA Helpdesk on how to acquire an account for posting commodity requests against this system.
Authorizing Post Requests
- Introduction
-
Authorization is the same process like the OPCE System.
- Registration
-
Same process as OPCE, as PPA Web API is a role-based system, the existing credentials for OPCE will work with EOR/EPS.
- Posting and Logging-In Credential
-
Exact same process as with OPCE
Posting Request and Receiving Response
Please see Web API Endpoint Documentation for the list of endpoints and their respective methods.
Hashing Request for Posting
- Hash Utility Method
- Below is a simple hashing method for generating request hash. Please strictly use this method for hashing as PPA will use this for re-hash.
-
using System.Web.Extensions;
using System.Security.Cryptography;
namespace Domain.Utilities {public class HashUtility {}
public static string ComputeHash(string inputText) {}var bytes = Encoding.UTF8.GetBytes(inputText);return sBuilder.ToString();
var sha256Managed = new SHA256Managed();
var sBuilder = new StringBuilder();
var hashByte = sha256Managed.ComputeHash(bytes);
//[byte by 8-bit hexadecimal val] by [64-byte characters] = 512-bit length hash code
foreach (var b in hashByte) {//convert byte data to hexa decimal small letter format instead of the usual raw base64 string}
sBuilder.Append(b.ToString(@"x2"));
//sample output: 691a671e9caa98ac894fbb379cd8cc9747cbcab8617008514bf2bfbc434e6bce }
Serializing Object Class for JSON
- Simple Json Serializer
-
You can use other serializer utility that serializes/deserializes C# objects. But we recommend to use the simple methods below for full compatibility.
NOTE: You don't need this utility if you are posting/getting requests via JQUERY. This utility is needed during the hash of the request, as the hash value is derived from a string converted to byte array, i.e., an object is serialized to JSON string then converted to byte array. -
using System.Web.Extensions;
namespace Domain.Utilities {
public class JsonSerializerUtility<T> where T : class {
public static string SerializeToJson(T dataToSerialize) {
var javaScriptSerializer = new}System.Web.Script.Serialization.JavaScriptSerializer();var result = javaScriptSerializer.Serialize(dataToSerialize);
return result;
}public static T DeserializeJson(string jsonString) {}
var javaScriptSerializer = new}System.Web.Script.Serialization.JavaScriptSerializer();var result = javaScriptSerializer.Deserialize<T>(jsonString);
return result;
Posting test requests via REST API Client
Using Thunder Client REST API Client for Visual Studio, or Postman, or any other REST API Client, you can test the API endpoints and their respective methods. We will use Thunder Client for this example.
Steps
-
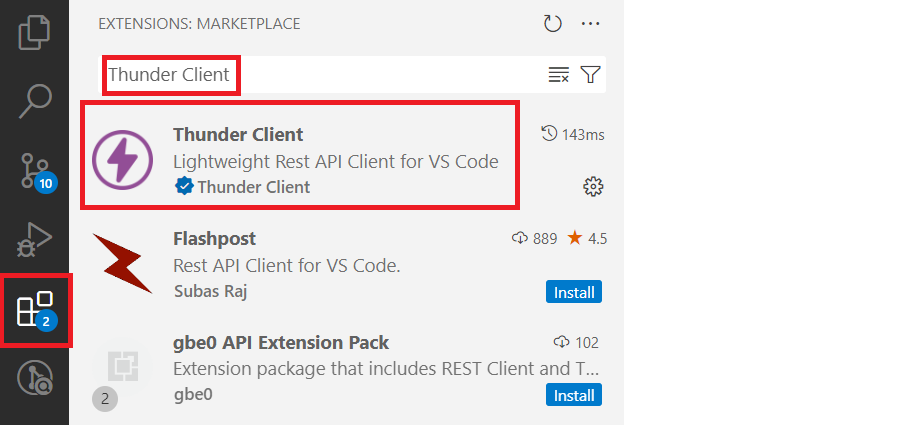
Download Visual Studio, and install the extension Thunder Client.
-
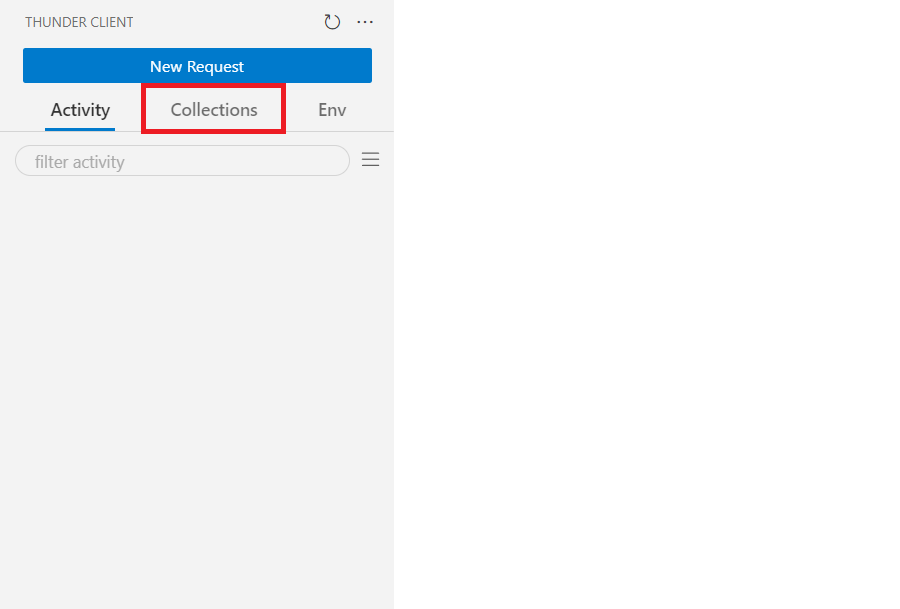
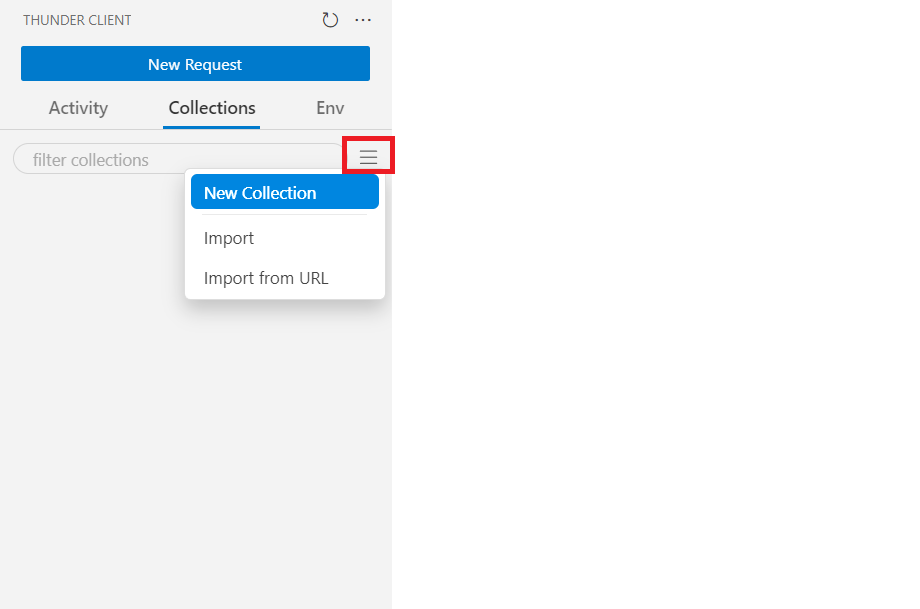
Open Thunder Client, and click the Collections tab.
-
Add a collection by clicking the = icon, and click New Collection.
-
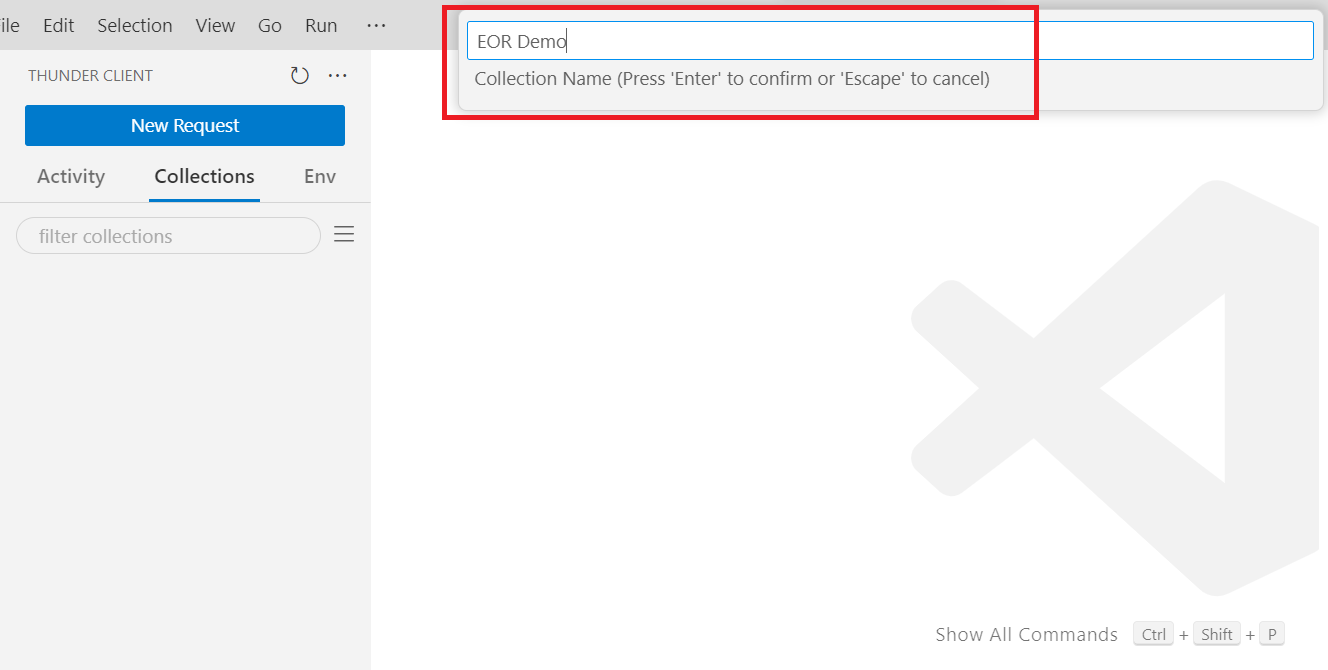
Type in "EOR Demo" (or you can use other naming convention), then press enter to save.
-
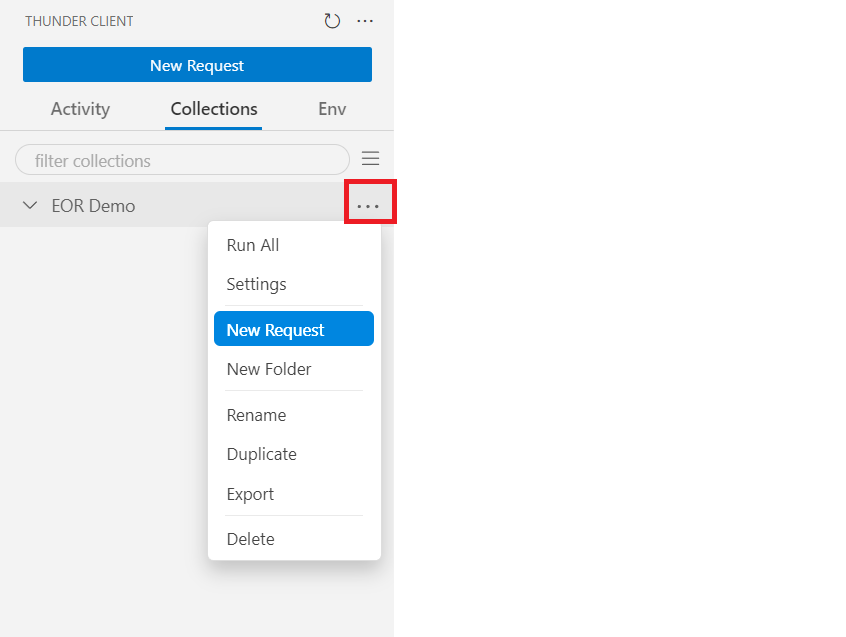
Once you have the EOR Demo collection, add a new request by clicking the ... icon, and click on New Request.
-
Here are the four requests you need to add:
Name: LoginGetJwtAsync
Live Endpoint URL: https://api.ppa.com.ph/api/signin/LoginGetJwtAsync
Staging Endpoint URL: https://webapi-staging.ppa.com.ph/api/signin/LoginGetJwtAsync
Name: PostDataForAckReceipt
Live Endpoint URL: https: //api.ppa.com.ph/api/eor/PostDataForAckReceipt
Staging Endpoint URL: https: //webapi-staging.ppa.com.ph/api/eor/PostDataForAckReceipt
Name: GenerateRequestHash
Live Endpoint URL: https://api.ppa.com.ph/api/eor/GenerateRequestHash
Staging Endpoint URL: https://webapi-staging.ppa.com.ph/api/eor/GenerateRequestHash
Name: RequestJwtEncryption
Live Endpoint URL: https://api.ppa.com.ph/api/eor/RequestJwtEncryption
Staging Endpoint URL: https://webapi-staging.ppa.com.ph/api/eor/RequestJwtEncryption
Start first with the LoginGetJwtAsync, by putting its name on the dialog box, then press enter.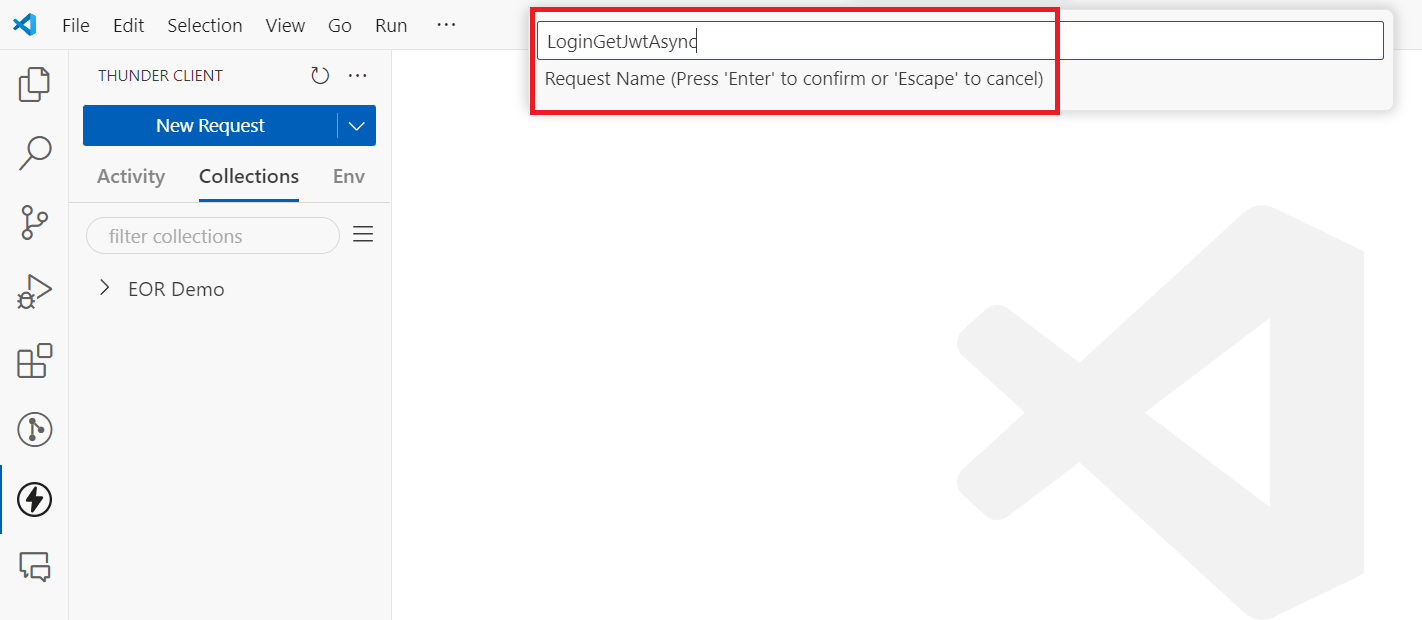
-
Double click the LoginGetJwtAsync request, then make sure to change the HTTP method to POST, and the URL into its proper Endpoint URL.
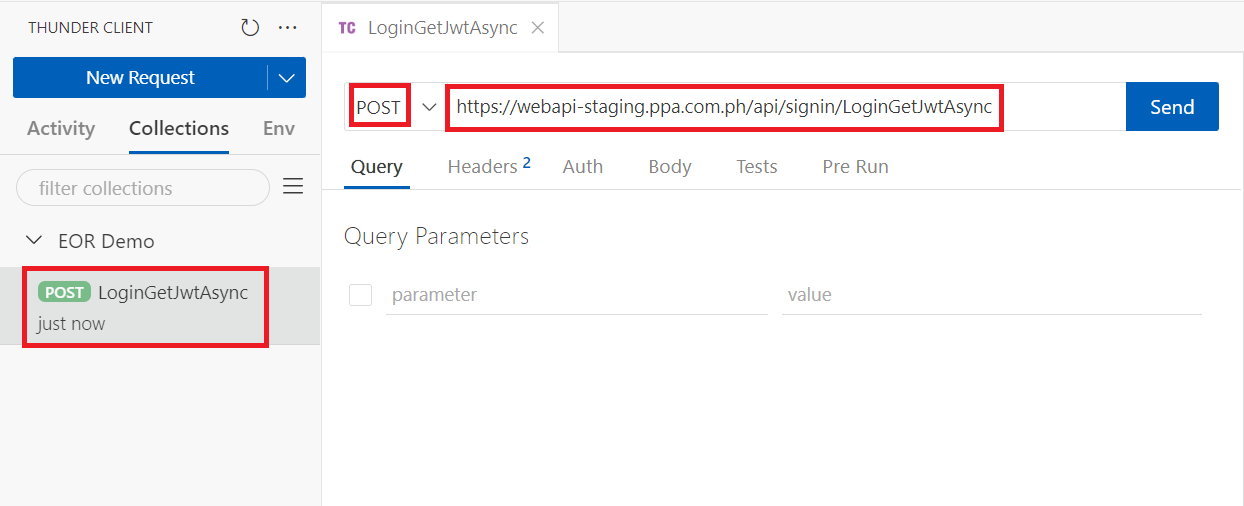
-
Repeat the steps to create all four API requests, the end result should be like this. If you have completed everything up to this step, you are now ready to send a post request.
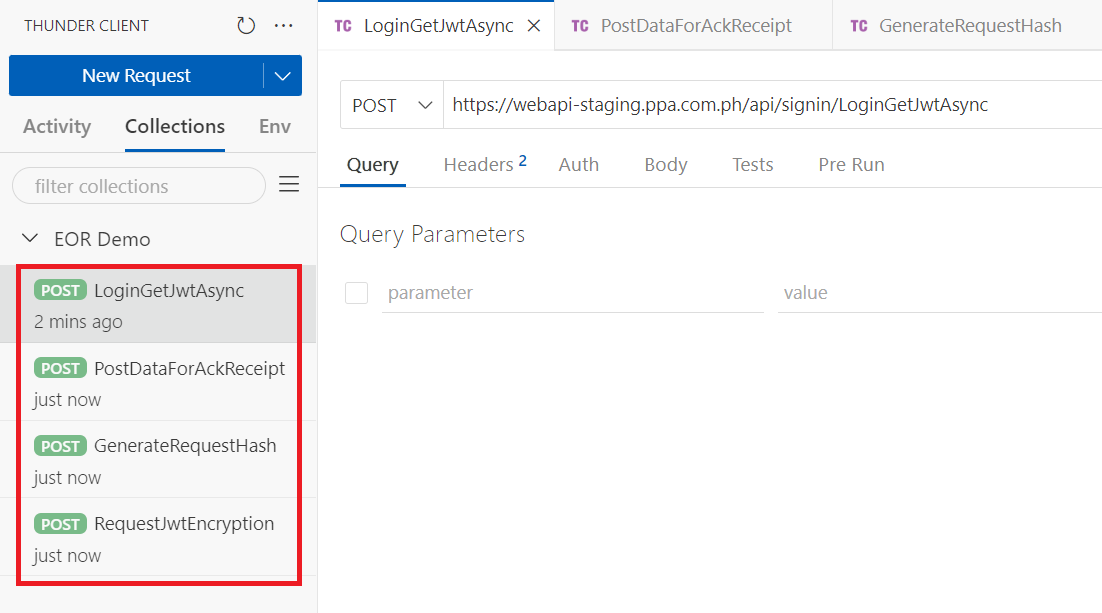
-
Before you can start posting for acknowledgment receipt, you need to get a JWT Token first from the LoginGetJwtAsync endpoint. To do that, click the LoginGetJwtAsync
request. After that, click the Body tab, then choose JSON. You can now put your account's email and password or you can use this credentials . If you are done with that, click the Send button.
NOTE: Make sure that the account you are using has a role of EOR API Consumer/Client.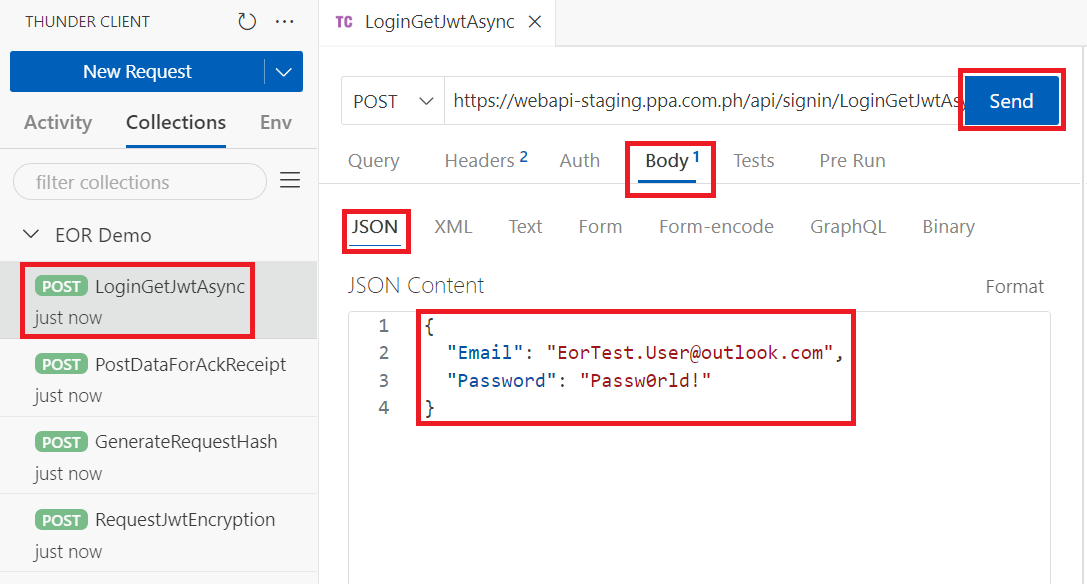
-
This should be the response that you will get from the sent request. Make sure to remember or simply save the JwtToken to your notes as this will be needed to send request to the other API endpoints.
NOTE: This JwtToken will expire in 20 mins both in the staging server, and the live server. Also, if you encountered any error, please refer to these UAT Test Cases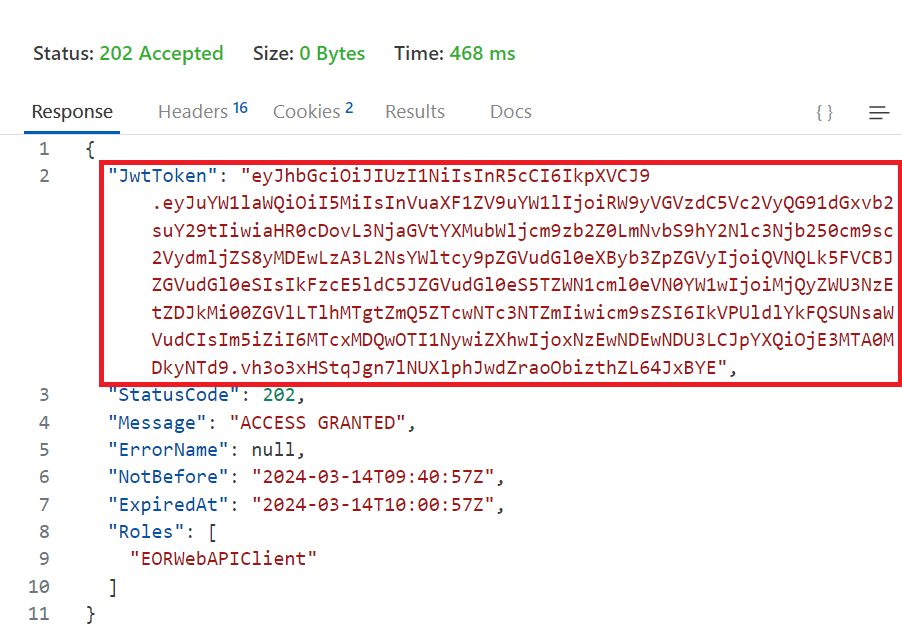
-
Now that you have a JwtToken, you can now send request to the PostDataForAckReceipt endpoint. To do this, click the PostDataForAckReceipt request. After that, click the Auth tab, then choose Bearer. Copy and paste the JwtToken you have received earlier to this field.
NOTE: Do not forget to persist this JwtToken as Bearer everytime you use this API endpoint as it will send an error.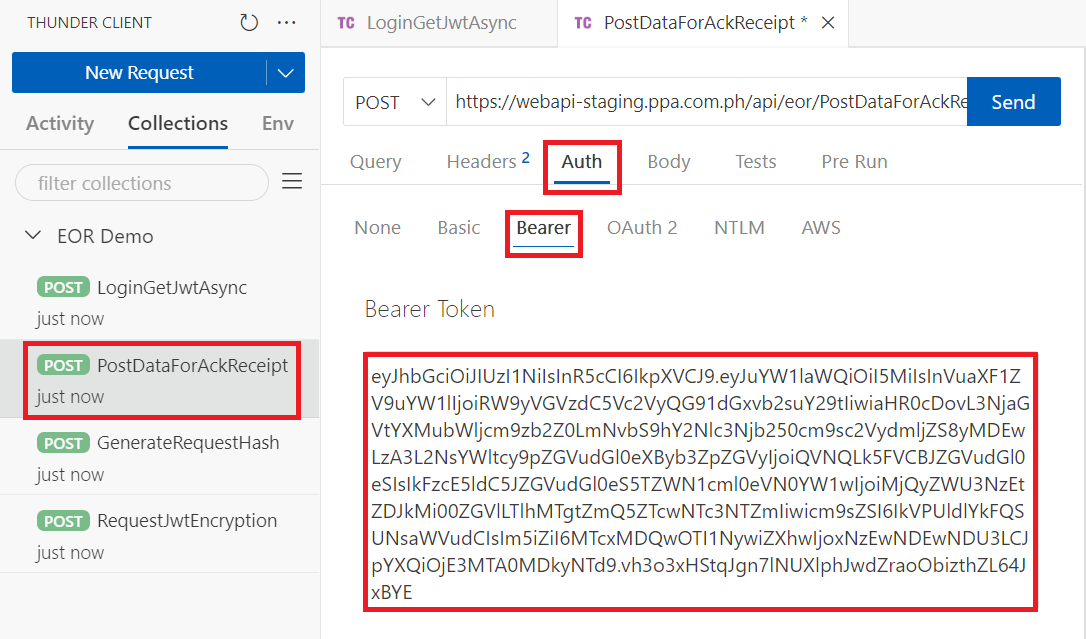
-
After persisting the JwtToken, click the Body tab, then go to JSON. Copy and paste this payload to the input field. As you can see in the payload, the HASH_CODE is empty. However, before we can send this request, we need a valid hash code. To do this, we need to use the GenerateRequestHash API endpoint.
NOTE: If you try to send this request with an empty or invalid HASH_CODE this will result to an error response.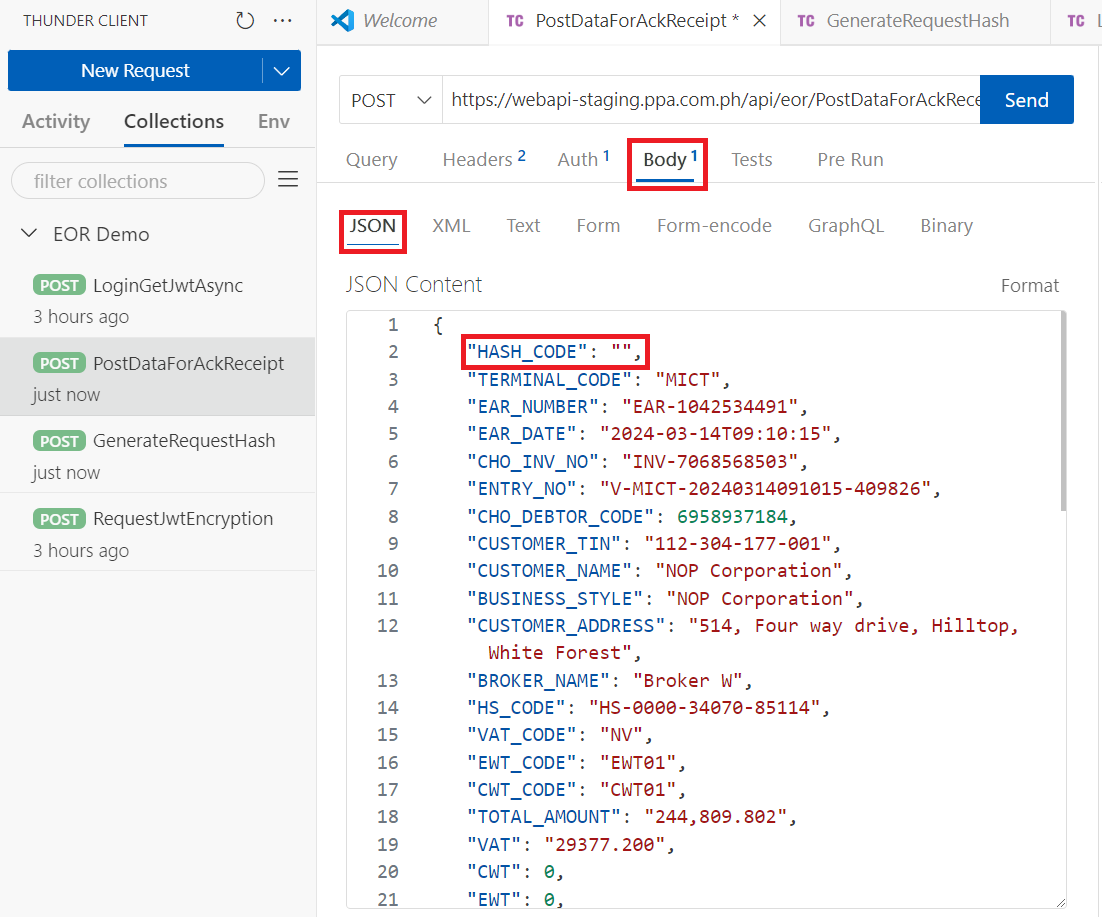
-
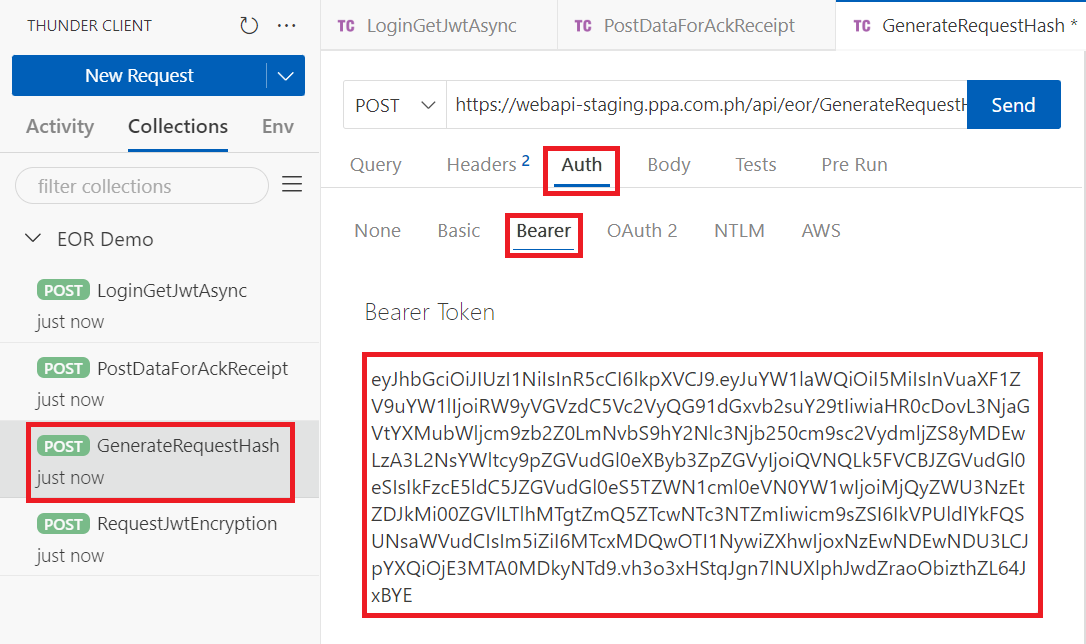
Open the GenerateRequestHash request tab, then just like the previous, under the Auth tab, click Bearer. After that, paste the JwtToken in the input field.
-
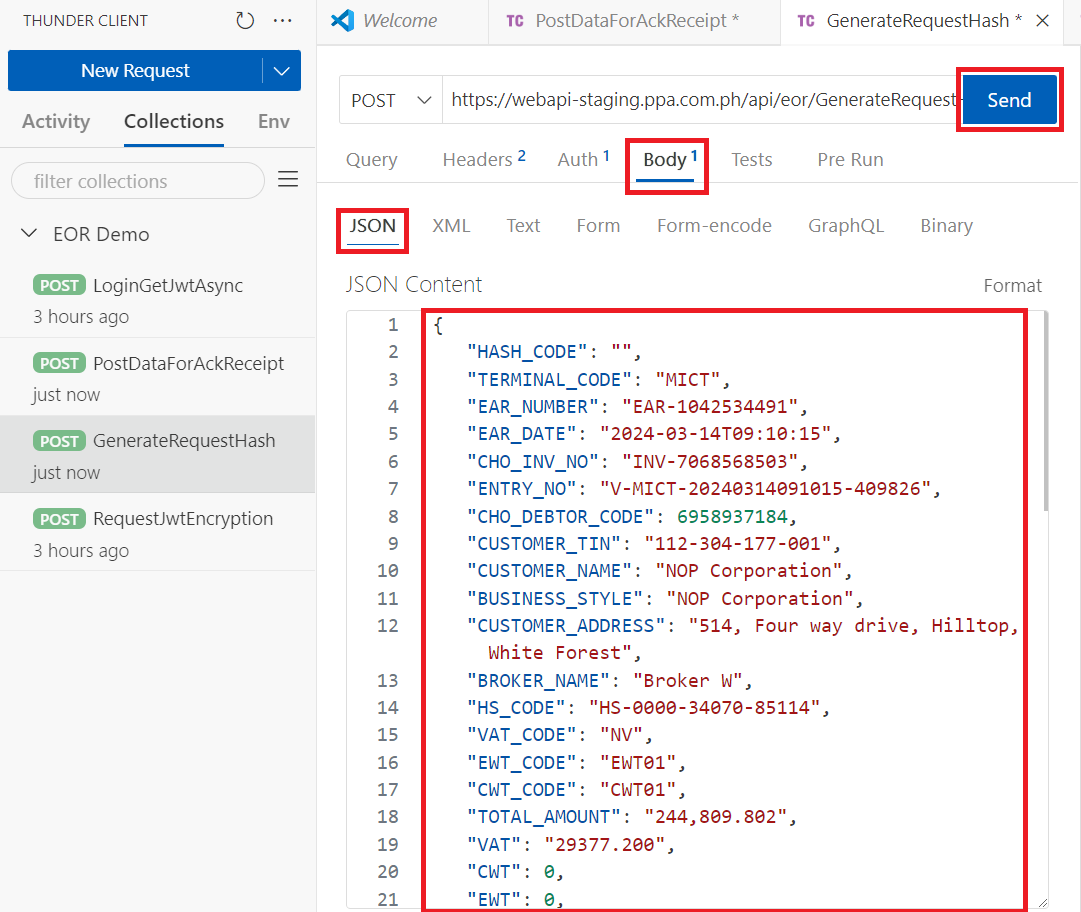
After placing the Bearer token, go to Body, then click JSON. After that, paste in the input field the same payload from earlier, then click the Send button.
-
By sending that request, you should have a response like this. Make sure to copy the ResponseData, as this will serve as the HASH_CODE of your request.
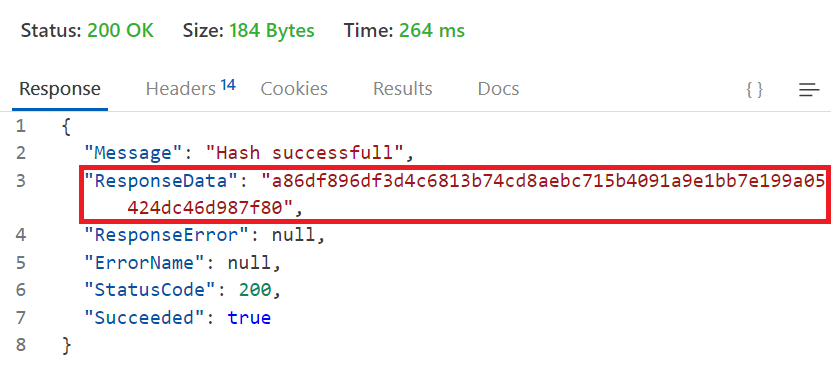
-
Go back to the PostDataForAckReceipt Body tab, then paste the generated hash code in the empty HASH_CODE property. After that, click the Send button.
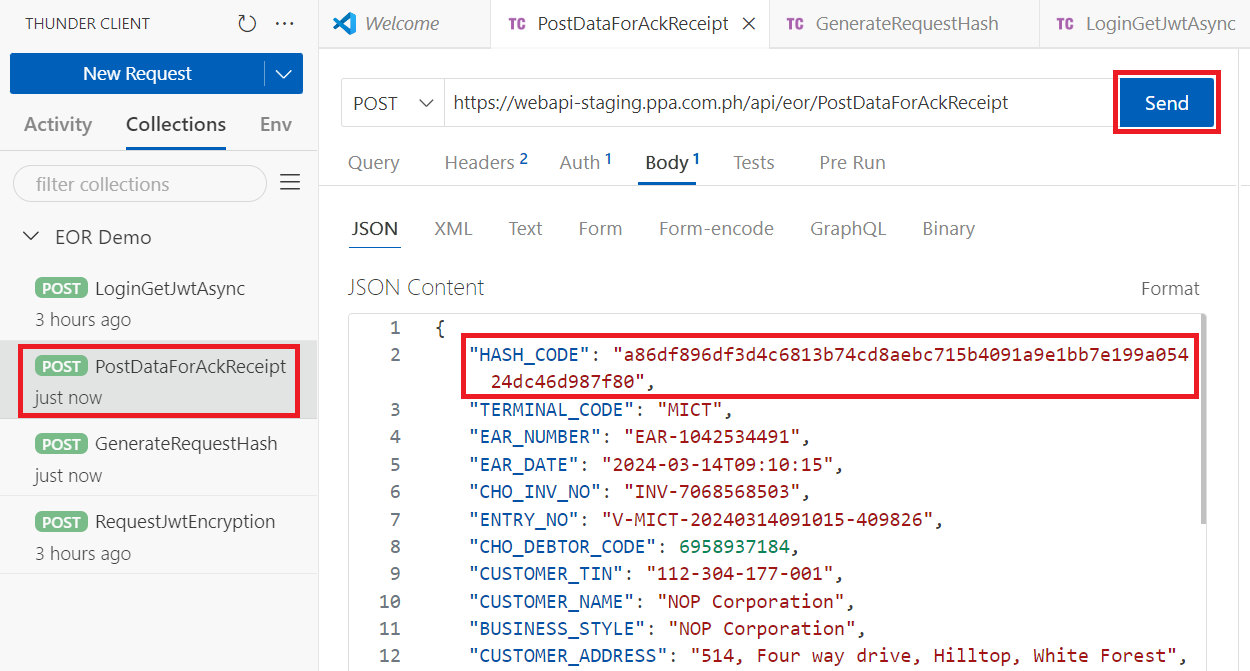
-
Once you have a successful response like this, you have finished posting the data for the acknowledgment receipt! The ReceiptPrintUrl shown in the response has an ejwt parameter which can be taken from the RequestJwtEncryption endpoint.
NOTE: If you encountered an error that says "DUPLICATE", this is because this payload has already been used by others. To solve this, simply modify some of the payload's properties. For example, you can change the "EAR_NUMBER", "CHO_INV_NO", or any other property besides the HASH_CODE. After modifying, do not forget to generate a new HASH_CODE using the GenerateRequestHash as this is a new request payload.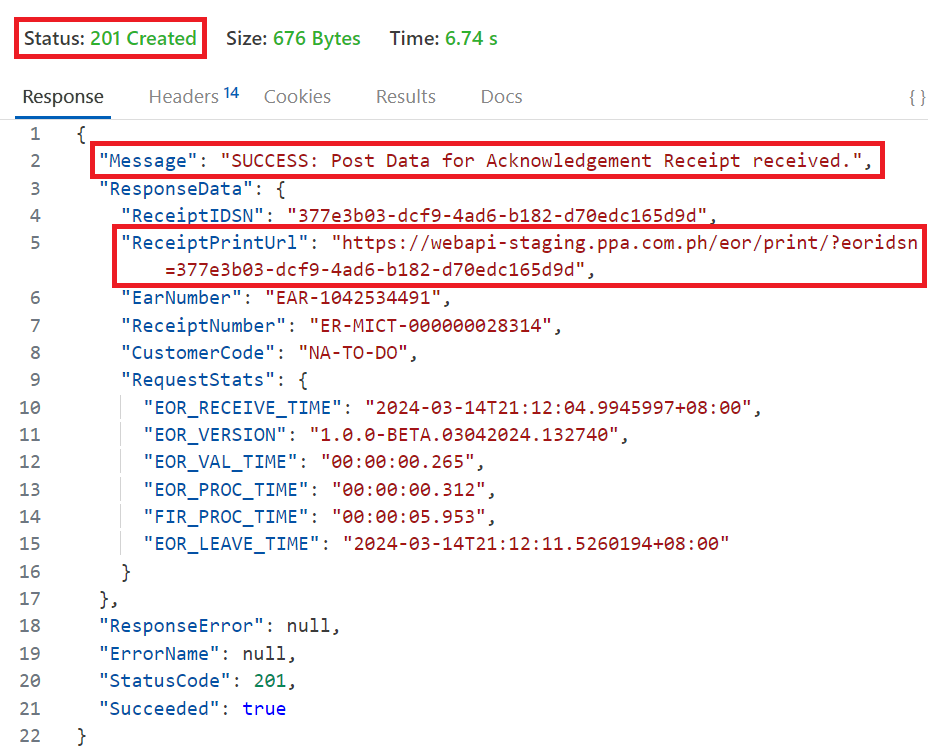
-
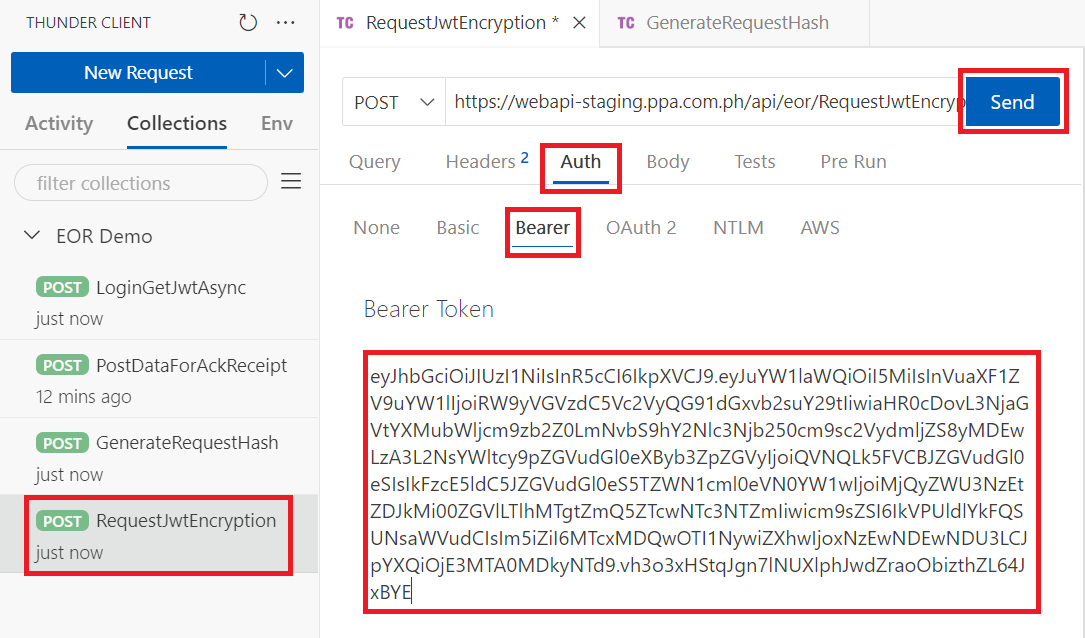
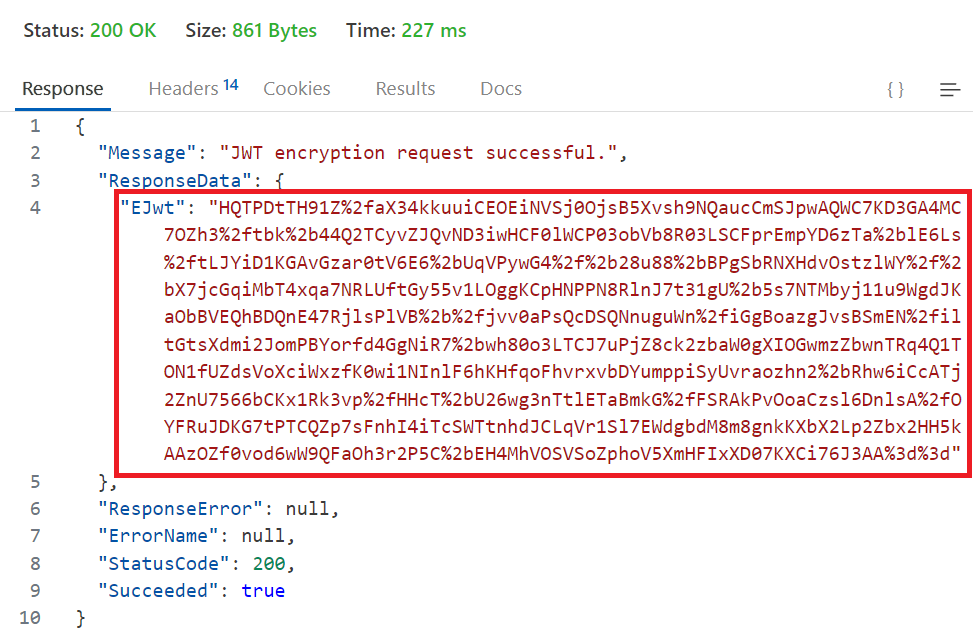
To encrypt the JWT Token into EJwt click the RequestJwtEncryption request, then go into the Auth tab which has the Bearer token. Place the JWT Token that you have used earlier in this input field. After that, click the Send button.
-
This should show a successful response which contains the EJwt which is used as the ejwt URL parameter when accessing the print receipt page.
Posting test requests via Test Simulation UI
For users that are not familiar with REST API Clients, you can use the EOR Test Simulator to send the same test requests.
Steps
-
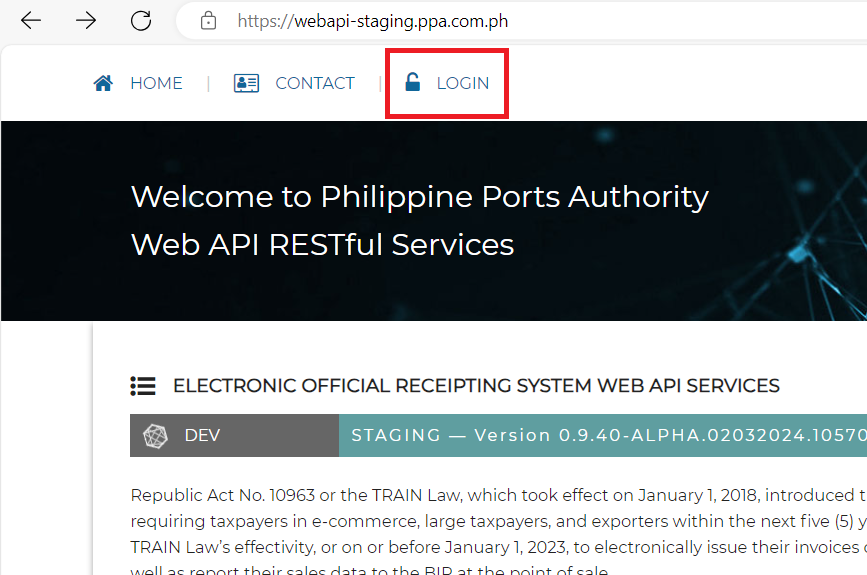
Open the PPA website using the links below.
Staging Server: https://webapi-staging.ppa.com.ph/
Live Server: This feature is disabled in the live server. -
Click the LOGIN from the navigation bar.
-
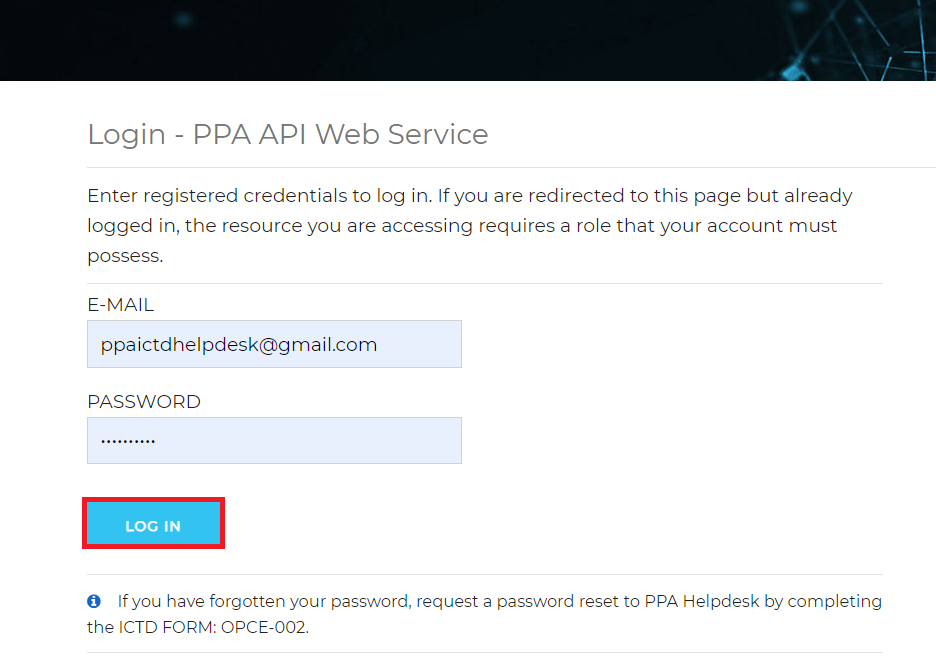
Enter your registered credentials to login. After inputting your credentials, click the LOG IN button.
Note: If you do not have an account yet, you can use this credentials for testing.
-
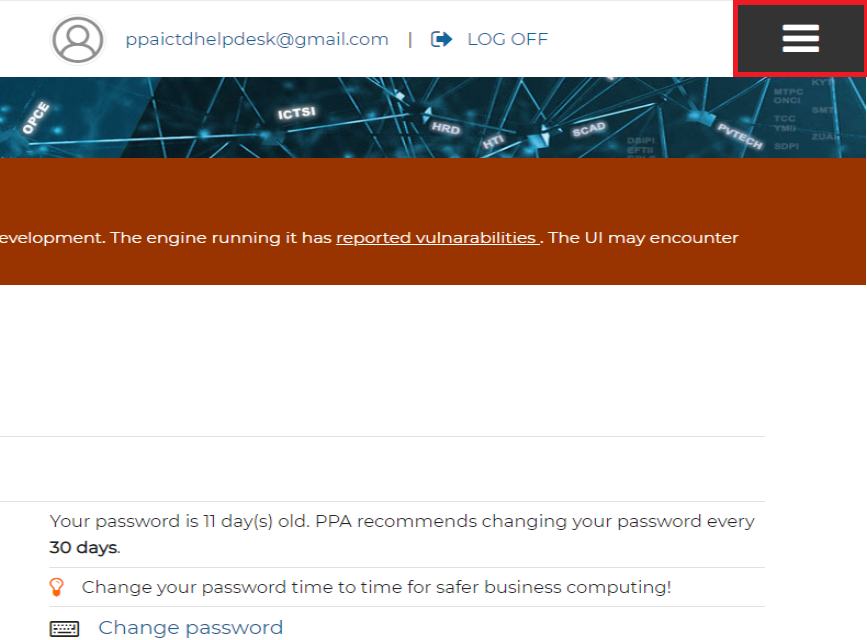
After successfully logging in, you will be redirected to the My Account page. In here, click the navigation bar icon on the top-right to open all the navigation tabs.
-
Click the EOR Module from the list of navigation tabs.
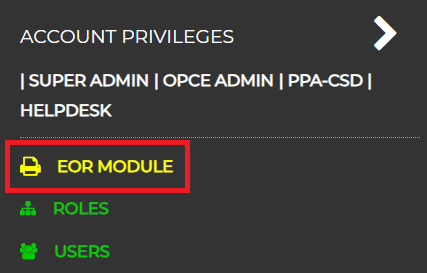
-
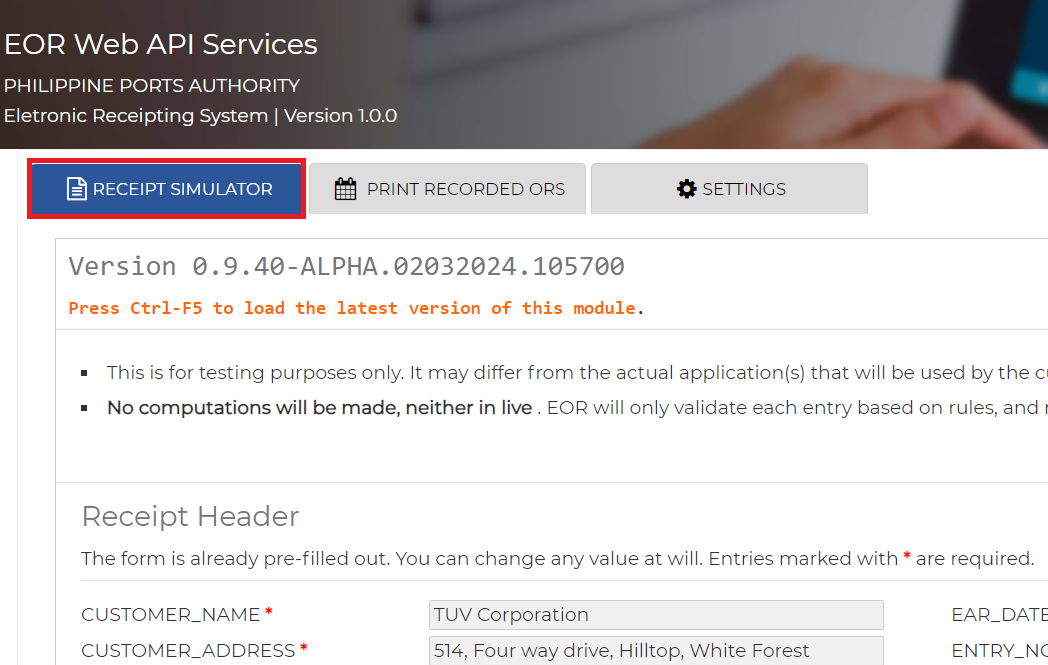
After clicking the EOR Module tab, you will be redirected to the EOR page. Make sure that you are on the Receipt Simulator tab.
-
To have fresh and unique data in the receipt simulator, click the Perfect Data button on the top-right side.
-
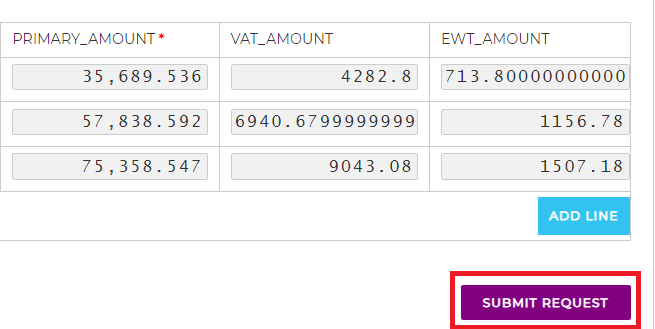
After generating the perfect data and all the input fields are filled, click the Submit Request button on the bottom-right side.
-
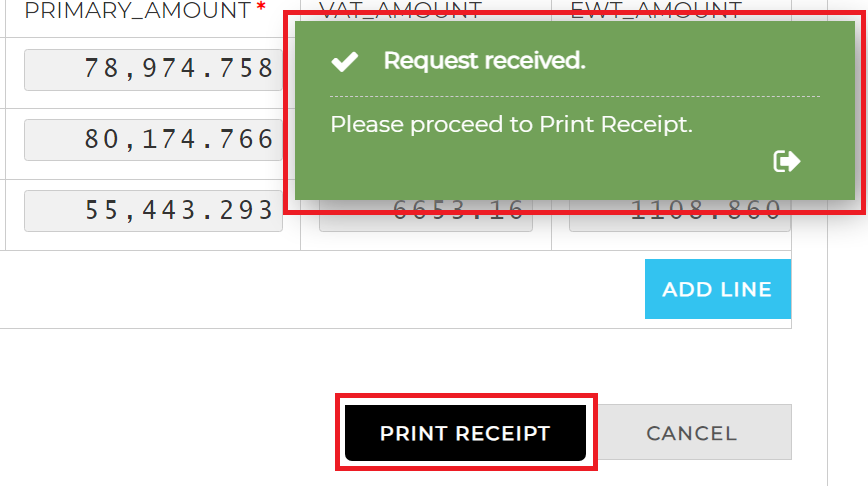
Once you have successfully posted the receipt, you will receive a success alert box. To generate and print the official receipt, click the Print Receipt button.
-
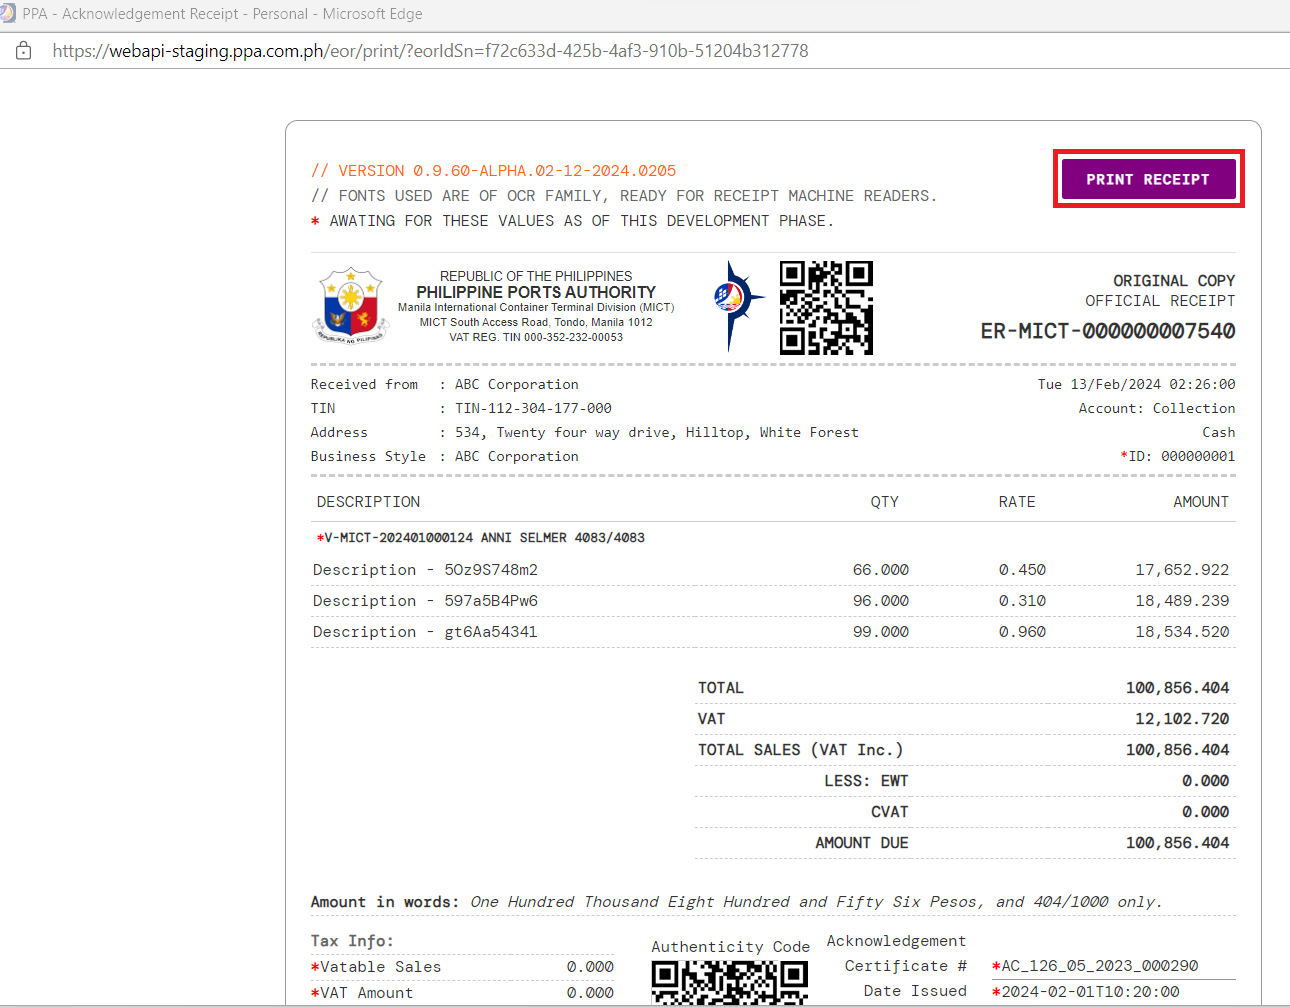
This will open a new tab containing the generated receipt based from the data you have inputted. Once you are done verifying if the information are correct, click the Print Receipt button at the top-right.
NOTE: You can scan both QR codes in this receipt. The top QR code will show the OR-MICT number, while the QR code at the bottom will redirect you to this exact generated receipt web page.
In this staging server, all QR codes are publicly available. However, once it hits the live server, only users with access to EOR will be able to view the QR codes.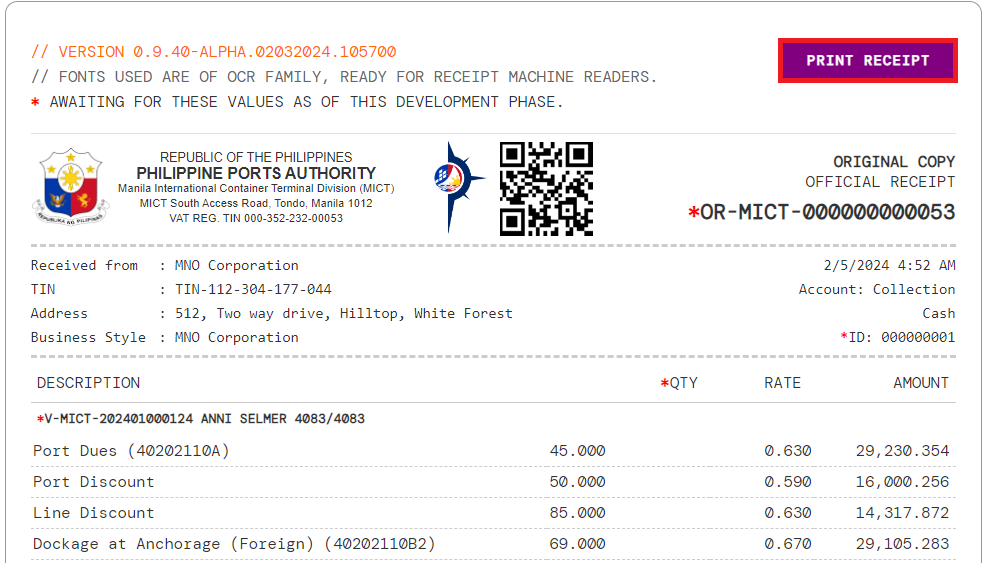
-
This will show a confirmation that states that you need to have your printer online and ready for printing before clicking the Confirm button.
NOTE: Once you have clicked confirm, the next time you will print this receipt, it will turn into a RE-PRINT, it will not be the ORIGINAL COPY anymore.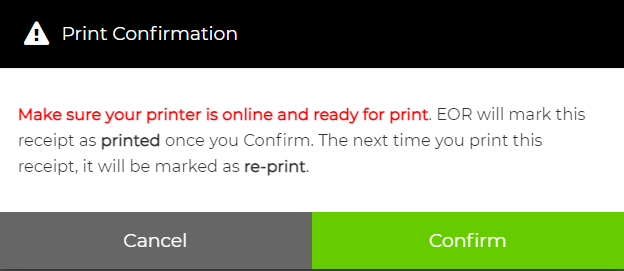
-
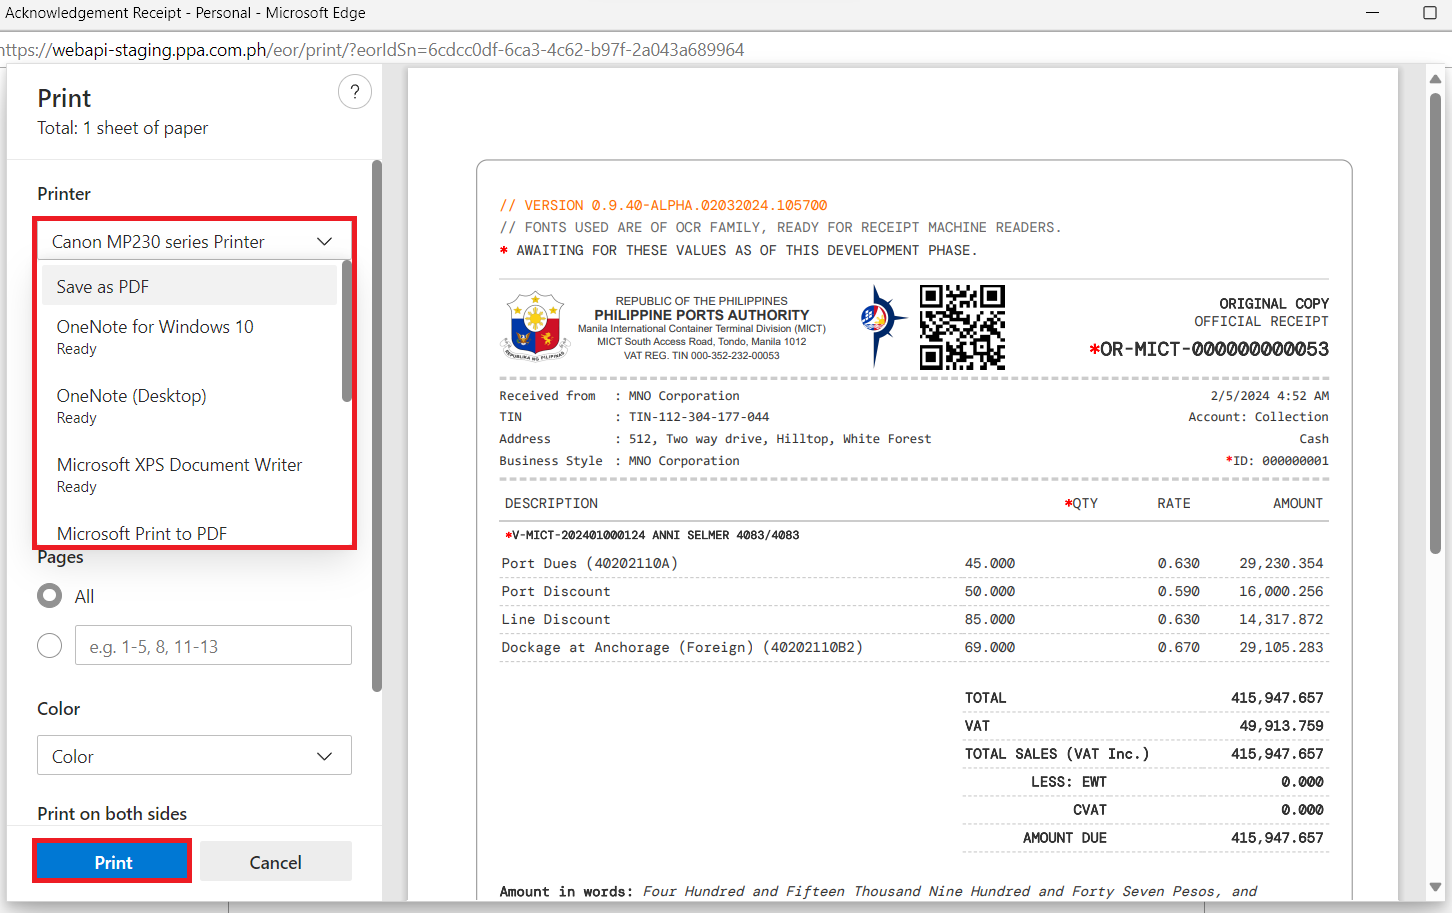
This will show the print view which has various print settings wherein you can choose what printer to use, or if you want to do other options that your system have. Once you are done customizing, you can click the Print button below to print the receipt.
Using the EOR Stress Test UI
The EOR Stress Test is used to perform a test wherein a number of requests are submitted to test if the system can handle the stress of the given load.
Steps
-
Open the PPA website using the links below.
Staging Server: https://webapi-staging.ppa.com.ph/
Live Server: https://api.ppa.com.ph/ -
Click the LOGIN from the navigation bar.
-
Enter your registered credentials to login. After inputting your credentials, click the LOG IN button.
Note: If you do not have an account yet, you can use this credentials for testing.
-
After successfully logging in, you will be redirected to the My Account page. In here, click the navigation bar icon on the top-right to open all the navigation tabs.
-
Click the EOR Module from the list of navigation tabs.
-
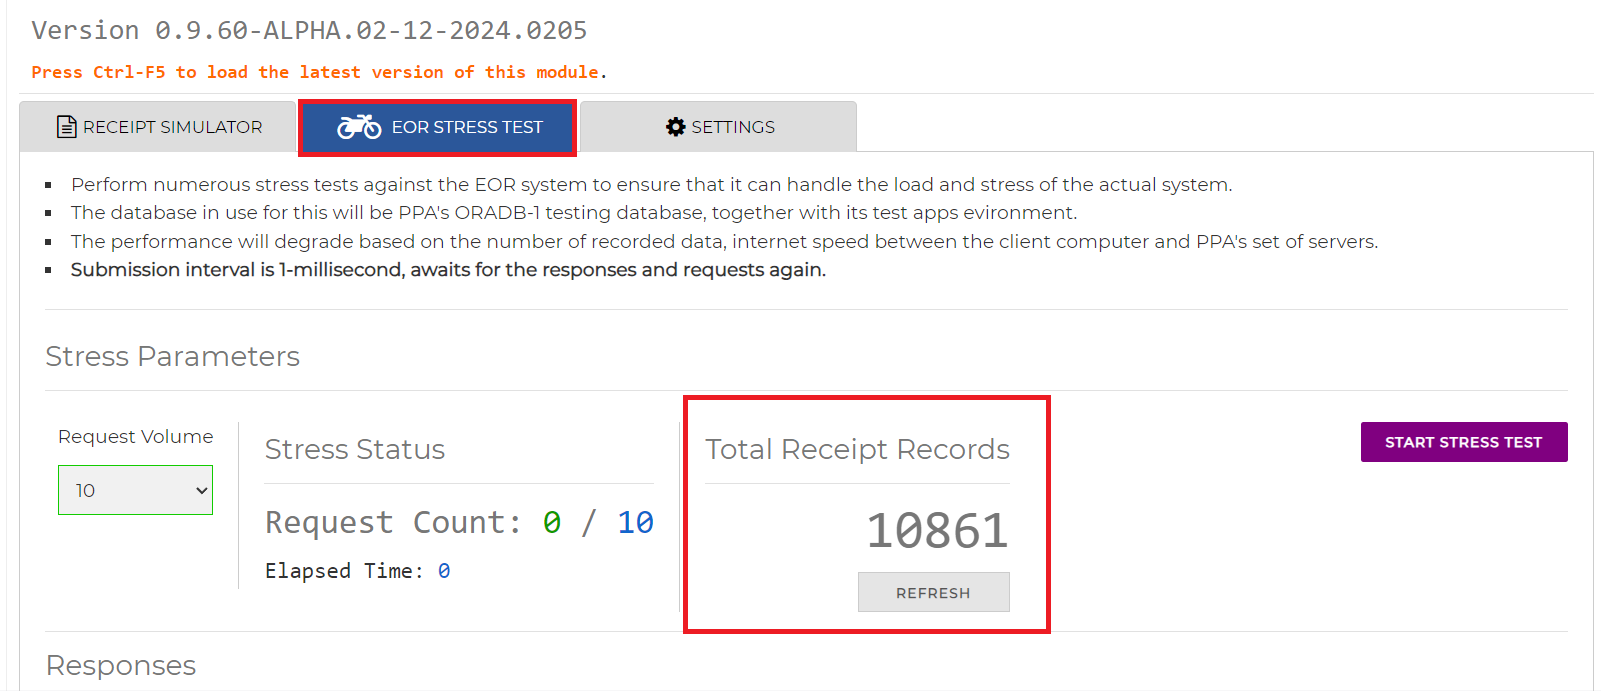
After clicking the EOR Module tab, you will be redirected to the EOR page. Make sure that you are on the EOR Stress Test tab.
You can also see the number of submitted receipts done by all the users in the Total Receipt Records.
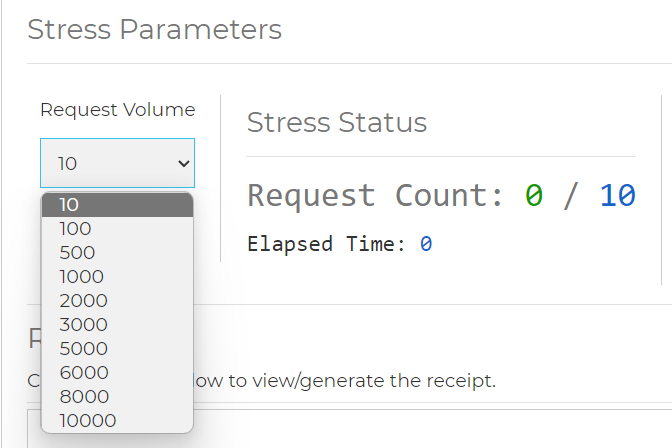
-
Choose the number of requests you want to run. The heavier the load, the longer the time it will take to complete the stress test.
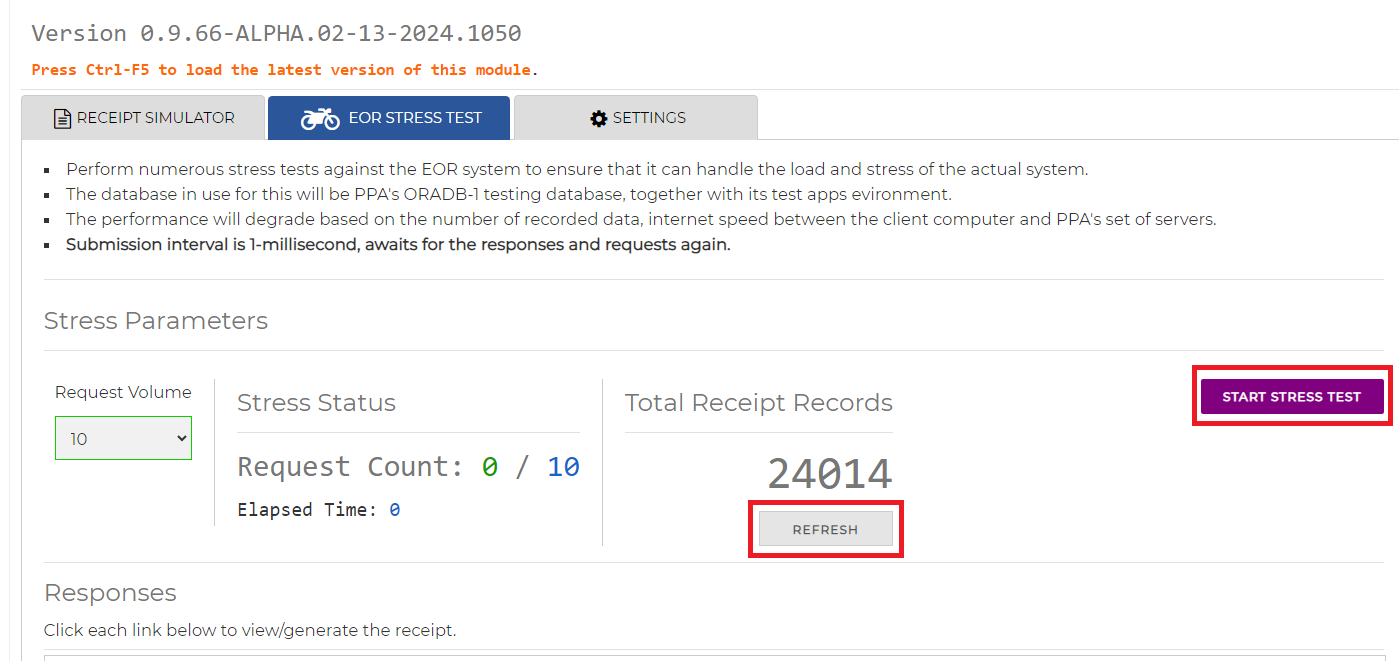
-
Click the Start Stress Test button in the right side. You can also click the Refresh button to update the live number of requests.
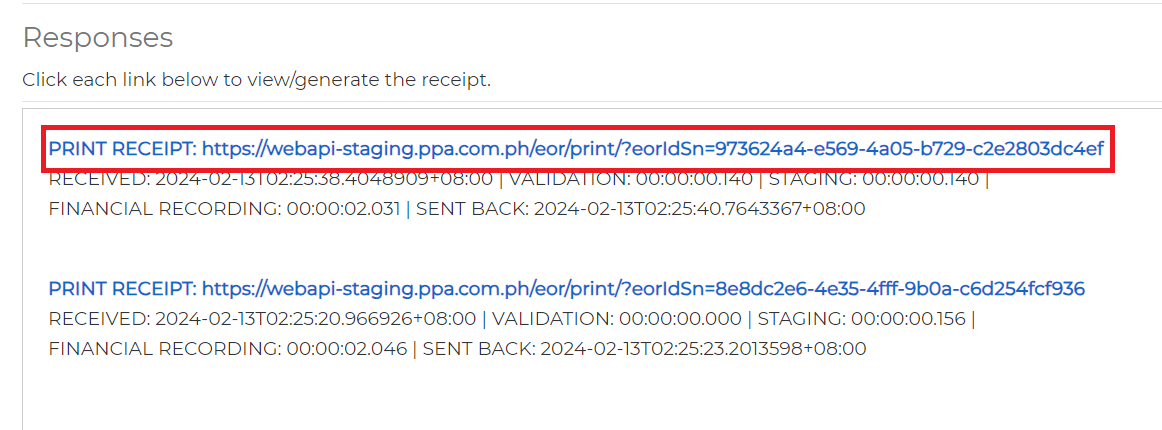
-
During the test, you can check the responses section in the bottom to see each of the request's details. You can also click the Print Receipt link to see the produce the printable receipt.
-
This will open a new tab containing the generated receipt based from the data of the stress test. You can verify if the receipt has correct information or check if the QR codes in the receipt can be scanned and if it returns the correct information. Also, you can check if it can be printed by clicking the Print Receipt button, then hit Confirm.